Learning Objectives:
Define version control.
Explain why version control is useful in a scientific workflow.
Implement version control using git.
Explain what remote repositories are and why they are useful.
Push to or pull from a remote repository.
Version Control Introduction
What is Version Control?
Version control is a powerful way to organize, back up, and share with collaborators your research computing code. A Version control system keeps track of a set of files and saves snapshots (i.e. versions, commits) of the files at any point in time. Using version control allows you to confidently make changes to your work, with the ability to roll back to any previous state.

We’ve all been in this situation before: it seems unnecessary to have multiple nearly-identical versions of the same document. Some word processors let us deal with this a little better, such as Microsoft Word’s Track Changes, Google Docs’ version history
Why Version Control is Important
Version control facilitates two important aspects of many scientific workflows:
The ability to save and review or revert to previous versions.
The ability to collaborate on a single project.
This means that you don’t have to worry about a collaborator (or your future self) overwriting something important. It also allows two people working on the same document to efficiently combine ideas and changes.
How Version Control Systems Works
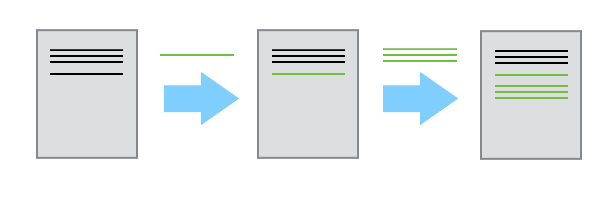
A version control system tracks what has changed in one or more files over time. Version control systems begin with a base version of a document. Then, they save the committed changes that you make.
You can think of version control as a tape: if you rewind the tape and start at the base document, then you can play back each change and end up with your latest version. Once you think of changes as separate from the document itself, you can then think about “playing back” different sets of changes onto the base document. You can then retrieve, or revert to, different versions of the document.
Collaboration with version control allows users to make independent changes to the same document: For example, Alice makes the changes in green and Bob makes the changes in red.
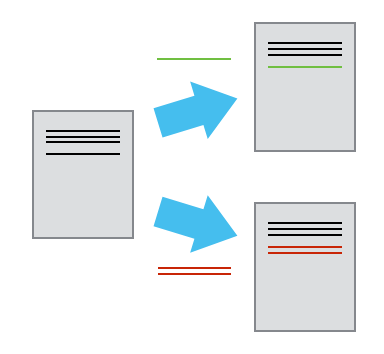
If there aren’t conflicts between the changes from Alice and Bob (a conflict is an area where both users modified the same part of the same document in different ways), you can review two sets of changes and merge them into the same base document.
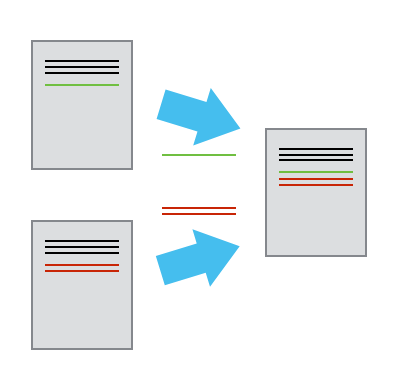
If there are conflicts, they can be resolved by choosing which change you want to keep.
Introduction to Git
Setting up
The tool we will be using for version control is called Git. Git is incredibly powerful–it also has a somewhat steep learning curve. Fortunately, in this class, we will only be using a small subset of what git can do, avoiding the more complex aspects. There are several online resources for learning advanced git and I encourage you to check those out if you’re interested.
When we use Git on a new computer for the first time, we need to configure a few things. Below are a few examples of configurations we will set as we get started with Git:
our name and email address,
what our preferred text editor is,
and that we want to use these settings globally (i.e. for every project).
On a command line, Git commands are written as git verb options, where verb is what we actually want to do and options is additional optional information which may be needed for the verb. So here is how Blaster sets up its new laptop:
$ git config --global user.name "Blaster the Donkey"
$ git config --global user.email "blaster@mines.edu"
Please use your own name and email address instead of Blaster’s. This user name and email will be associated with your subsequent Git activity, which means that any changes pushed to GitHub, or another Git host server after this lesson will include this information.
In this course, we will be interacting with GitHub and so the email address used should be the same as the one used when setting up your GitHub account (i.e, you Mines email).
As with other keys, when you hit Enter or ↵ or on Macs, Return on your keyboard, your computer encodes this input as a character. Different operating systems use different character(s) to represent the end of a line. (You may also hear these referred to as newlines or line breaks.) Because Git uses these characters to compare files, it may cause unexpected issues when editing a file on different machines. Though it is beyond the scope of this lesson, you can read more about this issue in the Pro Git book.
You can change the way Git recognizes and encodes line endings using the core.autocrlf command to git config. The following settings are recommended:
On macOS and Linux:
$ git config --global core.autocrlf inputAnd on Windows:
$ git config --global core.autocrlf falseNow we will set Vim as our default text editor.
$ git config --global core.editor "vim"Git (2.28+) allows configuration of the name of the branch created when you initialize any new repository (more about branches below). We will use that feature to set it to main so it matches the the convention used on GitHub.
$ git config --global init.defaultBranch mainThe five commands we just ran above only need to be run once: the flag --global tells Git to use the settings for every project, in your user account, on this computer.
You can check your settings at any time:
$ git config --listYou can change your configuration as many times as you want: use the same commands to choose another editor or update your email address. Once Git is configured, we can start using it.
Git first steps
First let’s navigate to your GPGN268 directory and create a new directory named “resume” there:
$ cd ~/work/classes/GPGN268
$ mkdir resume
$ cd resume
Then we tell Git to make resume a repository – a place where Git can store versions of our files:
$ git init
Initialized empty Git repository in ~/resume
It is important to note that git init will create a repository that can include subdirectories and their files—there is no need to (and you shouldn’t!) create separate repositories nested within the resume repository, whether subdirectories are present from the beginning or added later. Also, note that the creation a directory (with mkdir) and its initialization as a repository (git init) are completely separate processes.
If we use ls -F to show the directory’s contents, it appears that nothing has changed:
$ ls -FBut if we add the -a flag to show everything, we can see that Git has created a hidden directory called .git:
$ ls -a
.	..	.git
Git uses this special subdirectory to store all the information about the project, including the tracked files and sub-directories located within the project’s directory. If we ever delete the .git subdirectory, we will lose the project’s history and the ability to switch between versions.
We can check that everything is set up correctly by asking Git to tell us the status of our project:
$ git statusLet’s create a file called resume.md that contains some og your academic and professional information. We’ll use vim to edit the file.
$ vim resume.mdType the text below into the resume.md file:
# Blaster the DonkeyLet’s first verify that the file was properly created by running the list command (ls):
$ ls -Fwe can check the content of the file by running:
$ cat resume.mdIf we check the status of our project again, Git tells us that it’s noticed the new file:
$ git status

On branch main

No commits yet

Untracked files:
   (use "git add <file>..." to include in what will be committed)

	resume.md

nothing added to commit but untracked files present (use "git add" to track)
The “untracked files” message means that there’s a file in the directory that Git isn’t keeping track of. We can tell Git to track a file using git add:
$ git add resume.md$ git status
On branch main
No commits yet
Changes to be committed:
(use "git rm --cached <file>..." to unstage)
new file: resume.mdGit now knows that it’s supposed to keep track of README.md, but it hasn’t recorded these changes as a commit yet. To get it to do that, we need to run one more command:
$ git commit -m "Add initial resume file"When we run git commit, Git takes everything we have told it to save by using git add and stores a copy permanently inside the special .git directory. This permanent copy is called a commit (or revision) and its short identifier is the sequence of characters above. Your commit may have another identifier.
We use the -m flag (for “message”) to record a short, descriptive, and specific comment that will help us remember later on what we did and why. If we just run git commit without the -m option, Git will launch vim (or whatever other editor we configured as core.editor) so that we can write a longer message.
Good commit messages start with a brief (<50 characters) statement about the changes made in the commit. Generally, the message should complete the sentence “If applied, this commit will” . If you want to go into more detail, add a blank line between the summary line and your additional notes. Use this additional space to explain why you made changes and/or what their impact will be.
If we run git status now:
$ git status

On branch main
nothing to commit, working tree clean
it tells us everything is up to date. If we want to know what we’ve done recently, we can ask Git to show us the project’s history using git log:
$ git logcommit f22b25e3233b4645dabd0d81e651fe074bd8e73b
Author: Blaster the Donkey <blaster@mines.edu>
Date: Tue Jan 24 09:51:46 2023
Add initial readme filegit log lists all commits made to a repository in reverse chronological order. The listing for each commit includes the commit’s full identifier (which starts with the same characters as the short identifier printed by the git commit command earlier), the commit’s author, when it was created, and the log message Git was given when the commit was created.
Now let’s say we would like to add more information to our README.md file. Let’s open it again on vim and add more lines
# Blaster the Donkey
- blaster@mines.edu
- Golden, CO
After saving and exiting Vim, we can check the content of the file again
$ cat resume.mdWhen we run git status now, it tells us that a file it already knows about has been modified:
$ git status

On branch main
Changes not staged for commit:
  (use "git add <file>..." to update what will be committed)
  (use "git checkout -- <file>..." to discard changes in working directory)

	modified:   resume.md

no changes added to commit (use "git add" and/or "git commit -a")
The last line is the key phrase: “no changes added to commit”. We have changed this file, but we haven’t told Git we will want to save those changes (which we do with git add) nor have we saved them (which we do with git commit). So let’s do that now. It is good practice to always review our changes before saving them. We do this using git diff. This shows us the differences between the current state of the file and the most recently saved version:
$ git diffThe output is cryptic because it is actually a series of commands for tools like editors and patch telling them how to reconstruct one file given the other. If we break it down into pieces:
The first line tells us that Git is producing output similar to the Unix
diffcommand comparing the old and new versions of the file.The second line tells exactly which versions of the file Git is comparing;
df0654aand315bf3aare unique computer-generated labels for those versions.The third and fourth lines once again show the name of the file being changed.
The remaining lines are the most interesting, they show us the actual differences and the lines on which they occur. In particular, the
+marker in the first column shows where we added a line.
After reviewing our change, it’s time to commit it:
$ git commit -m "Add contact information"On branch main
Changes not staged for commit:
(use "git add <file>..." to update what will be committed)
(use "git checkout -- <file>..." to discard changes in working directory)
modified: resume.md
no changes added to commit (use "git add" and/or "git commit -a")Whoops: Git won’t commit because we didn’t use git add first. Let’s fix that:
$ git add resume.md
$ git commit -m "Add contact information"
[main 34961b1] Add contact information
1 file changed, 2 insertions(+)Git insists that we add files to the set we want to commit before actually committing anything. This allows us to commit our changes in stages and capture changes in logical portions rather than only in large batches. For example, suppose we’re adding a few citations to relevant research to our thesis. We might want to commit those additions, and the corresponding bibliography entries, but not commit some of our work drafting the conclusion (which we haven’t finished yet).
To allow for this, Git has a special staging area where it keeps track of things that have been added to the current changeset but not yet committed.
Staging Area
If you think of Git as taking snapshots of changes over the life of a project, git add specifies what will go in a snapshot (putting things in the staging area), and git commit then actually takes the snapshot, and makes a permanent record of it (as a commit).

Remotes in GitHub
Everything that we have explored with Git so far has been done locally (on your computer). The power of version control can be augmented by working with remote repositories, which are often hosted using services like GitHub, Bitbucket or GitLab.
GitHub.com is a website that runs git behind the scenes but it also has additional tools that extend the functionality of git. GitHub allows you to manage projects and coordinate with others on updates to code, and other files in your repositories. GitHub also facilitates sharing your code with the world (OR with specific people if you need to work with a smaller group of people privately).
Let’s start by sharing the changes we’ve made to our current project with the world. To this end, we are going to create a remote repository that will be linked to our local repository.
Log in to GitHub, then click on the icon in the top right corner to create a new repository called “resume”. Make sure the spelling is exactly the same as your local directory.
As soon as the repository is created, GitHub displays a page with a URL and some information on how to configure your local repository.
SSH Background and Setup
Before you can connect to a remote repository, we needs to set up a way for your computer to authenticate with GitHub so it knows it’s you trying to connect to your remote repository.
We are going to set up the method that is commonly used by many different services to authenticate access on the command line. This method is called Secure Shell Protocol (SSH). SSH is a cryptographic network protocol that allows secure communication between computers using an otherwise insecure network.
SSH uses what is called a key pair. This is two keys that work together to validate access. One key is publicly known and called the public key, and the other key called the private key is kept private. Very descriptive names.
You can think of the public key as a padlock, and only you have the key (the private key) to open it. You use the public key where you want a secure method of communication, such as your GitHub account. You give this padlock, or public key, to GitHub and say “lock the communications to my account with this so that only computers that have my private key can unlock communications and send git commands as my GitHub account.”
What we will do now is the minimum required to set up the SSH keys and add the public key to a GitHub account.
We will run the list command to check what key pairs already exist on your computer.
$ ls -al ~/.sshYour output is going to look a little different depending on whether or not SSH has ever been set up on the computer you are using.
If you have not set up SSH on your computer, so his output is
ls: cannot access '/c/Users/Blaster/.ssh': No such file or directoryIf SSH has been set up on the computer you’re using, the public and private key pairs will be listed. The file names are either id_ed25519/id_ed25519.pub or id_rsa/id_rsa.pub depending on how the key pairs were set up.
Create an SSH key pair
To create an SSH key pair we will use this command, where the -t option specifies which type of algorithm to use (don’t worry about the details)
$ ssh-keygen -t ed25519If you are using a legacy system that doesn’t support the Ed25519 algorithm, use: `$ ssh-keygen -t rsa -b 4096
Generating public/private ed25519 key pair.
Enter file in which to save the key (/c/Users/Blaster/.ssh/id_ed25519):
We want to use the default file, so just press Enter.
Created directory '/c/Users/Blaster/.ssh'.
Enter passphrase (empty for no passphrase):
Now, it will prompt you for a passphrase. Be sure to use something memorable or save your passphrase somewhere, as there is no “reset my password” option.
Enter same passphrase again:After entering the same passphrase a second time, we receive the confirmation
Your identification has been saved in /c/Users/Blaster/.ssh/id_ed25519
Your public key has been saved in /c/Users/Blaster/.ssh/id_ed25519.pub
The key fingerprint is:
SHA256:SMSPIStNyA00KPxuYu94KpZgRAYjgt9g4BA4kFy3g1o
The key's randomart image is:
+--[ED25519 256]--+
|^B== o.          |
|%*=.*.+          |
|+=.E =.+         |
| .=.+.o..        |
|....  . S        |
|.+ o             |
|+ =              |
|.o.o             |
|oo+.             |
+----[SHA256]-----+
The “identification” is actually the private key. You should never share it. The public key is appropriately named. The “key fingerprint” is a shorter version of a public key.
Now that we have generated the SSH keys, we will find the SSH files when we check.
ls -al ~/.sshdrwxr-xr-x 1 Blaster 197121 0 Jul 16 14:48 ./
drwxr-xr-x 1 Blaster 197121 0 Jul 16 14:48 ../
-rw-r--r-- 1 Blaster 197121 419 Jul 16 14:48 id_ed25519
-rw-r--r-- 1 Blaster 197121 106 Jul 16 14:48 id_ed25519.pubCopy the public key to GitHub
Now we have a SSH key pair and we can run this command to check if GitHub can read our authentication.
ssh -T git@github.comThe authenticity of host 'github.com (192.30.255.112)' can't be established.
RSA key fingerprint is SHA256:nThbg6kXUpJWGl7E1IGOCspRomTxdCARLviKw6E5SY8.
This key is not known by any other names
Are you sure you want to continue connecting (yes/no/[fingerprint])? y
Please type 'yes', 'no' or the fingerprint: yes
Warning: Permanently added 'github.com' (RSA) to the list of known hosts.
git@github.com: Permission denied (publickey).Right, we forgot that we need to give GitHub our public key!
First, we need to copy the public key. Be sure to include the .pub at the end, otherwise you’re looking at the private key.
cat ~/.ssh/id_ed25519.pubssh-ed25519 AAAAC3NzaC1lZDI1NTE5AAAAIDmRA3d51X0uu9wXek559gfn6UFNF69yZjChyBIU2qKI Now, going to GitHub.com, click on your profile icon in the top right corner to get the drop-down menu. Click “Settings,” then on the settings page, click “SSH and GPG keys,” on the left side “Account settings” menu. Click the “New SSH key” button on the right side. Now, you can add the title (such as " Blaster’s laptop" so you can remember where the original key pair files are located), paste your SSH key into the field, and click the “Add SSH key” to complete the setup.
Now that we’ve set that up, let’s check our authentication again from the command line.
$ ssh -T git@github.comHi Blaster! You've successfully authenticated, but GitHub does not provide shell access.Good! This output confirms that the SSH key works as intended. We are now ready to push our work to the remote repository.
Connect local to remote repository
Now we can connect the local and remote repositories. We do this by making the GitHub repository a remote for the local repository. The home page of the repository on GitHub includes the URL string we need to identify it. Since we have already created our local repository, we just follow the instructions for “push an existing repository from the command line”
$ git remote add origin git@github.com:blaster/resume.gitPush local changes to a remote
Now that authentication is setup, we can return to the remote. This command will push the changes from our local repository to the repository on GitHub:
$ git push origin mainPull remote changes to a local
Now let’s imagine if your collaborator of your final project also pushed changes to the remote. To get their changes to your local machine, you can use
$ git pullThat will being the changes in Github to your local folder.
Clone a repository
Now let’s imagine you have found a useful package on Github, and you want to “download” the package to your local machine. You will use git clone. As an example, let’s clone the code for this book to Desktop.
$ cd Desktop # change directory to Desktop
$ git clone git@github.com:GPGN268/GPGN268-BOOK.git
Now you should see a GPGN268-BOOK folder on your desktop. You can see the code that made this online book.
Key Points
Version control is like an unlimited ‘undo’.
Version control also allows many people to work in parallel
git statusshows the status of a repository.git logshows the history of a repository.git addputs files in the staging area.git commitsaves the staged content as a new commit in the local repository.Write a commit message that accurately describes your changes.
A local Git repository can be connected to one or more remote repositories.
Use the SSH protocol to connect to remote repositories.
git pushcopies changes from a local repository to a remote repository.git pullbring changes from a remote repository to local.git clone“download” a pacakge from Github to your local computer.