Learning Objectives
Explain the similarities and differences between a file and a directory.
Translate an absolute path into a relative path and vice versa
Run
Bashcommands to complete the following tasks:print the current working directory (
pwd)navigate between directories on your computer (
cd)create new directories (
mkdir)print a list of files and subdirectories within directories (
ls)
Create a directory hierarchy that matches a given diagram.
Move and rename specified files and/or directories.
Describe machine and human readable names and the importance of using them to name directories and files.
Delete files and directories
Use wildcards and pipes to operate on multiple files and combine operations
Introducing the shell
Modern computers have graphical user interfaces (known as GUIs) that make it easy to perform tasks. While the visual aid of a GUI makes it intuitive to learn, this way of delivering instructions to a computer scales very poorly. Imagine the following task: for a literature search, you have to copy the third line of one thousand text files in one thousand different directories and paste it into a single file. Using a GUI, you would not only be clicking at your desk for several hours, but you could potentially also commit an error in the process of completing this repetitive task. This is where we take advantage of the Unix shell. The Unix shell is both a command-line interface (CLI) and a scripting language, allowing such repetitive tasks to be done automatically and fast. With the proper commands, the shell can repeat tasks with or without some modification as many times as we want. Using the shell, the task in the literature example can be accomplished in seconds
The shell is a program where users can type commands. With the shell, it’s possible to invoke complicated programs like climate modeling software or simple commands that create an empty directory with only one line of code. The most popular Unix shell is Bash (the Bourne Again SHell — so-called because it’s derived from a shell written by Stephen Bourne). Bash is the default shell on most modern implementations of Unix and in most packages that provide Unix-like tools for Windows.
Using the shell will take some effort and some time to learn. While a GUI presents you with choices to select, CLI choices are not automatically presented to you, so you must learn a few commands like new vocabulary in a language you’re studying. However, unlike a spoken language, a small number of “words” (i.e. commands) gets you a long way, and we’ll cover those essential few today.
The grammar of a shell allows you to combine existing tools into powerful pipelines and handle large volumes of data automatically. Sequences of commands can be written into a script, improving the reproducibility of workflows.
Additionally, the command line is often the easiest way to interact with remote machines and supercomputers. Familiarity with the shell is essential for running specialized tools, high-performance computing systems, and research workflows. As cluster and cloud computing systems become more prevalent in scientific research, command-line skills are increasingly necessary. Building on the skills covered here will help you tackle a wide range of scientific questions and computational challenges.
Let’s get started.
Navigating files and directories
To get started, open a terminal using the “terminal” application on masOS or WSL on Windows. When the shell is first opened, you are presented with a prompt, indicating that the shell is waiting for input. You will see something like this:
ryan@dune:~$The dollar sign is a prompt, which shows us that the shell is waiting for input. ryan is my username and dune is my hostname. We each have a different username and hostname (the name of the computer we are using), which may change depending on the machine you are using. From now on, we will use a $ to indicate the prompt. Do not type the dollar sign and the space when typing commands (either from these notes or from other sources) – only type the commands that follow it. Also note that after you type a command, you have to press the Enter key to execute it.
To find out your username in general, you can use the command
$ whoami
ryan
Next, let’s find out where we are by running a command called pwd (which stands for “print working directory”). At any moment, our current working directory is our current default directory, i.e., the directory that the computer assumes we want to run commands in unless we explicitly specify something else. Here, the computer’s response is /Users/ryan, which is the home directory of the user named ryan.
$ pwd
/Users/ryan
To understand what a “home directory” is, let’s look at how the file system is organized. For this example, we’ll illustrate the filesystem on a hypothetical Mines computer. After this illustration, you’ll learn commands to explore your own filesystem, which will be structured similarly but not identically.
On a Mac computer, the filesystem looks like something this:
At the top is the root directory that holds everything else. We refer to it using a slash character / on its own; this is the leading slash in /Users/ryan.
Inside that directory are several other directories: Library (for the software “libraries” used by different programs), bin (which is where some built-in programs are stored), Users (where users’ personal directories are located), System (system-wide configuration files), and so on.
Note for Windows users
Note that the Terminal uses forward slashes (/) to indicate directories within a path. This differs from the Windows File Explorer which uses backslashes (\) to indicate directories within a path. Your home directory might look something like C:\Documents and Settings\nelle or C:\Users\nelle depending on your Windows version. You can access your C drive using /mnt/c.
To follow the note below, you should type cd /mnt/c/Users/yourusername.
Now let’s learn the command that will let us see the contents of our own filesystem. We can see what’s in our home directory by running ls, which stands for “listing”:
$ ls
Applications		Documents		Library			Music			Public
Desktop			Downloads		Movies			Pictures		note-template.md
(Again, your results may be slightly different depending on your operating system and how you have customized your filesystem.)
ls prints the names of the files and directories in the current directory in alphabetical order, arranged neatly into columns. We can make its output more comprehensible by using the flag -F, which tells ls to add a trailing / to the names of directories:
$ ls -F
Applications/		Library/		Public/
Desktop/		Movies/			note-template.md
Documents/		Music/
Downloads/		Pictures/
ls has lots of other options. To find out what they are, we can type:
$ ls --helpExploring Other Directories
Not only can we use ls on the current working directory, but we can use it to list the contents of a different directory. Let’s take a look at our Desktop directory by running ls -F Desktop, i.e., the command ls with the -F option and the argument Desktop. The argument Desktop tells ls that we want a listing of something other than our current working directory:
$ ls -F Desktop
well-log-data/
Your output should be a list of all the files and sub-directories in your Desktop directory. On many systems, the command line Desktop directory is the same as your GUI Desktop. Take a look at your Desktop to confirm that your output is accurate.
As you may now see, using a bash shell is strongly dependent on the idea that your files are organized in a hierarchical file system. Organizing things hierarchically in this way helps us keep track of our work: it’s possible to put hundreds of files in our home directory, just as it’s possible to pile hundreds of printed papers on our desk, but it’s a self-defeating strategy.
We can use ls to look at the content of subdirectories, by passing the path to the target diretory. For example, if we want to know the contents of well-log-data, we run:
$ ls Desktop/well-log-dataAnother thing that we might want to do is to actually change our location to a different directory, so we are no longer located in our home directory. The comand to change locations is cd followed by a directory name to change our working directory. cd stands for “change directory”, which is a bit misleading: the command doesn’t change the directory, it changes the shell’s idea of what directory we are in. The cd command is akin to double-clicking a folder in a graphical interface to get into a folder.
Let’s say we want to move to the logging-resources directory we saw above. We can use the following series of commands to get there:
$ cd Desktop
$ cd well-log-data
$ cd logging-resources
These commands move us from our home directory to the Desktop directory, then to the well-log-data directory, and finally to the logging-resources directory. Notice that cd doesn’t print anything—this is normal. Many shell commands produce no output when successfully executed. Running pwd afterward shows we’re now in /Users/ryan/Desktop/well-log-data/logging-resources.
If we run ls -F without arguments now, it lists the contents of /Users/ryan/Desktop/well-log-data/logging-resources, because that’s where we now are.
We now know how to go down the directory tree (i.e. how to go into a subdirectory), but how do we go up (i.e. how do we leave a directory and go into its parent directory)? We might try the following:
$ cd well-log-data
cd: no such file or directory: well-log-data
But we get an error! Why is this?
With our methods so far, cd can only see sub-directories inside your current directory. There are different ways to see directories above your current location; we’ll start with the simplest.
There is a shortcut in the shell to move up one directory level that looks like this:
$ cd .... is a special directory name meaning “the directory containing this one”, or more succinctly, the parent of the current directory. Sure enough, if we run pwd after running cd .., we’re back in /Users/ryan/Desktop/well-log-data/:
$ pwd
/Users/ryan/Desktop/well-log-data/
The special directory .. doesn’t usually show up when we run ls. If we want to display it, we can add the -a option to ls -F:
$ ls -F -a logging-resources
./  ../  logging_data_figure.pdf   logging_methods.pdf
-a stands for ‘show all’ (including hidden files); it forces ls to show us file and directory names that begin with ., such as .. (which, if we’re in /Users/ryan, refers to the /Users directory). As you can see, it also displays another special directory that’s just called ., which means ‘the current working directory’. It may seem redundant to have a name for it, but we’ll see some uses for it soon.
Note that in most command line tools, multiple options can be combined with a single - and no spaces between the options: ls -F -a is equivalent to ls -Fa.
These three commands are the basic commands for navigating the filesystem on your computer: pwd, ls, and cd. Let’s explore some variations on those commands. What happens if you type cd on its own, without giving a directory?
$ cdHow can you check what happened? pwd gives us the answer!
$ pwd
/Users/ryan
It turns out that cd without an argument will return you to your home directory, which is great if you’ve got lost in your own filesystem.
Let’s try returning to the logging-resources directory from before. Last time, we used three commands, but we can actually string together the list of directories to move to exercise-data in one step:
$ cd Desktop/well-log-data/logging-resourcesCheck that we’ve moved to the right place by running pwd and ls -F.
If we want to move up one level from the data directory, we could use cd ... But there is another way to move to any directory, regardless of your current location.
So far, when specifying directory names, or even a directory path (as above), we have been using relative paths. When you use a relative path with a command like ls or cd, it tries to find that location from where we are, rather than from the root of the file system.
However, it is possible to specify the absolute path to a directory by including its entire path from the root directory, which is indicated by a leading slash. The leading / tells the computer to follow the path from the root of the file system, so it always refers to exactly one directory, no matter where we are when we run the command.
This allows us to move to our well-log-data directory from anywhere on the filesystem (including from inside logging-resources). To find the absolute path we’re looking for, we can use pwd and then extract the piece we need to move to well-log-data.
$ pwd
/Users/ryan/Desktop/well-log-data/logging-resources
$ cd /Users/ryan/Desktop/well-log-data/Run pwd and ls -F to ensure that we’re in the directory we expect.
Two More Shortcuts
The shell interprets the character
~(tilde) at the start of a path to mean “the current user’s home directory”. For example, if my home directory is/Users/ryan, then~/Desktopis equivalent to/Users/ryan/Desktop. This only works if it is the first character in the path.Another shortcut is the
-(dash) character.cdwill translate-into the previous directory I was in, which is faster than having to remember, then type, the full path. This is a very efficient way of moving back and forth between directories. The difference betweencd ..andcd -is that the former brings you up, while the latter brings you back. You can think of it as the Last Channel button on a TV remote.
Tab Completion
Typing the full path to directories and files can be slow and annoying. Fortunately, we have “tab completion” to help us. From your home, try typing cd De and then press the <tab>. The system will try to “auto complete” your command. Pressing tab twice brings up a list of all the files, and so on. This is called tab completion, and we will see it in many other tools as we go.
File and Directory Organization
Importance of Directory and File Names
When creating directories and files, use a carefully crafted naming convention that makes it easier for anyone (including you) to find things and understand what each file contains.
It is good practice to use file and directory names that are:
Human readable: use consistent, expressive names that clearly describe what the directory or file contains (e.g. code, data, outputs, figures).
Machine readable: avoid strange characters or white spaces. Instead of spaces, you can use
-or_to separate words within the name to make them easy to read and parse.Sortable: it is nice to be able to sort files to quickly see what is there and find what you need. For example, you can create a naming convention for a list of related directories or files (e.g.
L01-notes.md,L02-notes.md, etc), which will result in sortable files.
If you need to refer to names of files or directories that have whitespace or another non- alphanumeric character, you should surround the name in quotes (“”).
Creating Directories
We now know how to explore files and directories, but how do we create them in the first place? In this lecture, we will learn about creating and moving files and directories.
Step one: see where we are and what we already have.
$ pwd
/Users/ryan
In my case, I’m in my home directory. If you are in a different directory, use cd ~ to take you to your home and check it using pwd. Now, let see what is the content of our home directory.
$ ls -FWe will start by creating a directory called work in our home .
$ mkdir workAs you might guess from its name, mkdir means ‘make directory’. Since work is a relative path (i.e., does not have a leading slash, like /what/ever/work), the new directory is created in the current working directory:
$ ls -F
Applications/     Library/        Public/
Desktop/          Movies/			    note-template.md
Documents/        Music/			    work/
Downloads/        Pictures/
Note that mkdir is not limited to creating single directories one at a time. The -p option allows mkdir to create multiple directories with nested subdirectories in a single operation.
$ mkdir -p work/classes work/research $ ls -F work
classes/ research/Following the filesystem illustrated below, create a directory named using the convention coursework-your-last-name under GPGN268, which is under the classes directory.
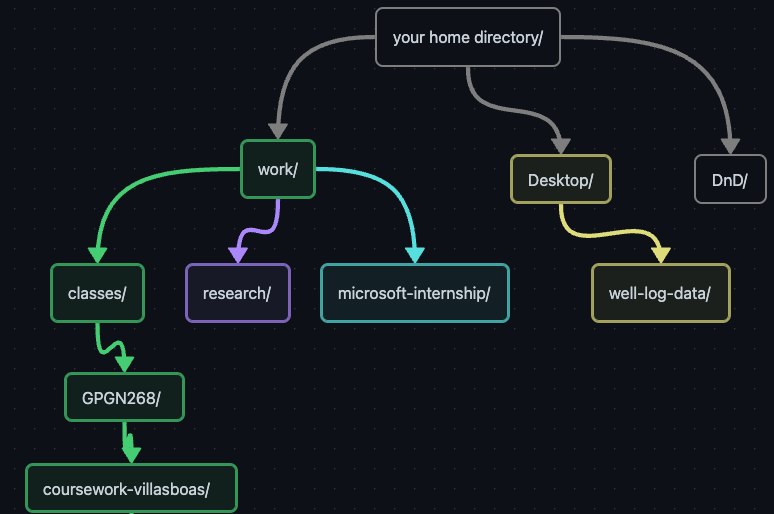
$ mkdir -p work/classes/GPGN268/coursework-villasboasThe -R option to the ls command will list all nested subdirectories within a directory. Let’s use ls -FR to recursively list the new directory hierarchy we just created in the work directory:
$ ls -FR work
classes/	research/
work/classes:
GPGN268/
work/classes/GPGN268:
coursework-villasboas/
work/classes/GPGN268/coursework-villasboas:
work/research:
The Structure of a Project
Organize directories to make it easy to find data, code, and outputs.
Store all of the files relevant to one project under a common
rootdirectory named after the project.Rather than saving a bunch of files into a single directory, consider using separate directories to store data, scripts, figures, and writing associated with the project. This makes it easier to navigate and find components of your projects.
Document your workflow on a logbook file that records your progress in detail. These entries should be dated and contain as much detail as possible, including links, images, and a record of your observations, conclusions, and ideas for future work.
Record information about the data in a README file, where you specify what is the data, who downloaded the data files, from what URL, on what date, if any processing has been performed, etc.
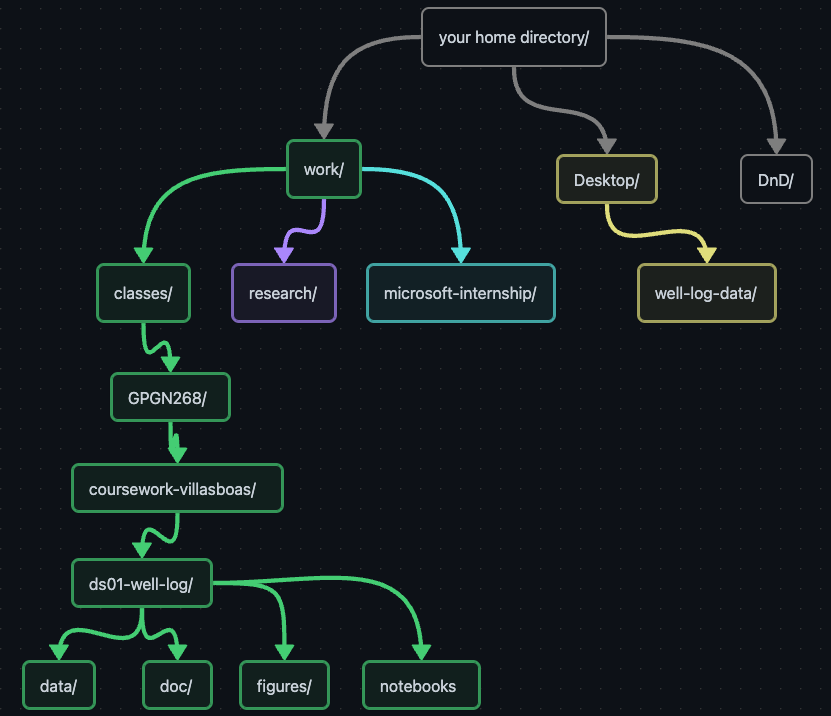
In a few weeks, we’ll start working on “Data Stories”—small projects focusing on a specific type of geophysical data. Let’s practice these concepts with our first data story: well-logs. Since there will be many Data Stories, it’s useful to have a way to sort each project. Let’s navigate to our coursework directory and create the structure for our first project:
$ cd ~/work/classes/GPGN268/coursework-villasboas
$ pwd
$ mkdir ds01-well-logThis convention groups all Data Story directories together (all start with the prefix “ds”) and sorts them by the order we start working on them. The name that follows is expressive and tells us what the project is about. For example, our second Data Story will focus on global warming:
$ mkdir ds02-global-warmingNow let’s go ahead and create some subdirectories to organize our project.
$ cd ds01-well-log
$ mkdir data notebooks figures
Let’s keep it like this for now. As we get started with our projects we might decide that is useful to create more directories.
What’s In a File Name?
You may have noticed that all of our data files are named ‘something dot something’, for example, .csv. This is just a convention: we can call a file mycampaign or almost anything else we want. However, most people use two-part names most of the time to help them (and their programs) tell different kinds of files apart. The second part of such a name is called the filename extension and indicates what type of data the file holds: .txt signals a plain text file, .pdf indicates a PDF document, .md is a Markdown text file, .png is a PNG image, and so on.
This is just a convention, albeit an important one. Files contain bytes: it’s up to us and our programs to interpret those bytes according to the rules for plain text files, PDF documents, configuration files, images, and so on.
Naming a PNG image of a whale as whale.mp3 doesn’t somehow magically turn it into a recording of whale song, though it might cause the operating system to try to open it with a music player when someone double-clicks it.
Moving and Renaming Files
In our previous lecture, we downloaded well-log data from Canvas and placed it in a directory under Desktop. Now that we have a directory for our well-log project, it makes sense to move the well-log data there. To move ~/Desktop/well-log-data to our new project, we’ll use the mv command, which stands for “move”. The syntax is $ mv source target, where source and target can be absolute or relative paths.
For example
if $ pwd shows $ ds01-well-log, we can run
$ mv ~/Desktop/well-log-data data/$ ls -F data
well-log-data/If we check the contents of well-log-data, we find a file called iodp-usio-acronyms.html. Searching for “IODP” leads to the International Ocean Drilling Program website, suggesting these data came from IODP. Exploring IODP’s website, we find a data repository hosted by Columbia University, where you can search for data from different IODP expeditions and holes. Our files follow the naming convention expedition-hole-XXXX.csv. Try to find a specific expedition and hole number that matches a file in your dataset.
Given that the data you downloaded from Canvas came from IODP, how could we make the directory name well-log-data more expressive?
The command mv can also rename files and directories. Let’s try:
$ cd data
$ mv well-log-data iodp-logging-data
$ ls -F
We found the original source of our well-log data and also lots of information that could be useful for our analysis and for our future selves. Following the best practices that we discussed in the File and Directory Organization section, let’s create a README file explaining what the data is and where it came from.
Further command-line functionalities
Wildcards
Often you need to perform an operation (e.g., move) on multiple files at once. You can provide a list of filenames or specify a pattern using wildcards.
* is a wildcard, which matches zero or more characters. Let’s consider the iodp-logging-data directory: *.csv matches 372-U1517A_cali-nscope.csv, 372-U1517A_gr-gvr.csv, and every file that ends with *.csv. On the other hand, 376*.csv only matches the files starting with 376.
When the shell encounters a wildcard, it expands it to create a list of matching filenames before running the command. If a wildcard matches no files, Bash passes the expression as-is to the command. For example, typing $ ls *.txt in the iodp-logging-data directory produces an error because no files match *.txt.
You can use multiple wildcards anywhere in a filename. For example, our logging data has files from three different holes (U1517A, U1520A, U1520B) for expedition 372. To list all files from hole U1520A, run:
$ ls *U1520A*.csvThis lists all files with any characters before U1520A, any characters after U1520A, and ending with .csv.
Wildcards work with other commands too. For example, to count lines in all files from hole U1520A, run:
$ wc -l *U1520A*.csv
 407 372-U1520A_cali-nscope.csv
 407 372-U1520A_den-nscope.csv
3402 372-U1520A_gr-gvr.csv
2034 372-U1520A_gr-nscope.csv
 692 372-U1520A_misc-gvr.csv
 399 372-U1520A_por-nscope.csv
 420 372-U1520A_res-atten-nscope.csv
 692 372-U1520A_res-gvr.csv
 420 372-U1520A_res-phase-nscope.csv
 422 372-U1520A_tp-nscope.csv
 421 372-U1520A_vel-sscope.csv
9716 total
The flag -l tells wc to show only the number of lines.
Let’s organize some files
Now that we know how to move files and operate on multiple files, let’s organize our data. We have data from two expeditions (372 and 376), with expedition 372 having three holes. We’ll create one directory per expedition and one subdirectory per hole, then use mv and wildcards to sort the files into their subdirectories.
$ pwd
/Users/ryan/work/classes/GPGN268/coursework-villasboas/ds01-well-log/iodp-logging-data
$ mkdir EXP372 EXP376
$ cd EXP372
$ mkdir U1520A U1517A U1520B
$ mv 372*U1520A*.csv EXP372/U1520ASimilarly for the other holes.
Combining multiple commands
We know that wc -l counts lines in a given input, but what if we could use it to count lines in the output from ls -1? The shell lets us combine commands using “pipes”.
$ ls -1 U1520A | wc -l
12
The vertical bar, |, between the two commands is called a pipe. It tells the shell that we want to use the output of the command on the left as the input to the command on the right.
Let’s try to use pipes with other commands.
$ ls U1520A | head -n 2The shell executes head -n 2 on the output of ls U1520A. Now let’s use wildcards to count lines in all files of hole U1520A:
$ wc U1520A/*.csvNote that the output is sorted by filename, not line count. To sort by line count (least first), combine wc and sort:
$ wc U1520A/*.csv | sortTo reverse the order, use:
$ wc U1520A/*.csv | sort -rDeleting
The Unix command we’ll use for deleting is rm (short for ‘remove’).
Let’s try this with the file iodp-usio-acronyms.html:
$ cd ~/work/classes/GPGN268/coursework-villasboas/ds01-well-log/iodp-logging-data
$ ls -F
$ rm iodp-usio-acronyms.html
$ ls -FIf you look in your system’s trash using the graphical interface, you won’t see iodp-usio-acronyms.html there. It’s gone.
In our previous lecture, we created a directory called research but haven’t used it. Let’s delete it.
$ cd ~/work
$ ls -F
$ rm research
rm: cannot remove `thesis`: Is a directoryThis occurs because rm by default only works on files, not directories. To delete a directory, we must use the recursive option for rm, which removes everything in the directory and then the directory itself:
$ rm -r researchKey Points
“The file system is responsible for managing information on the disk.”
“Information is stored in files, which are stored in directories (folders).”
“Directories can also store other directories, which forms a directory tree.”
“
cd pathchanges the current working directory.”“
ls pathprints a listing of a specific file or directory;lson its own lists the current working directory.”pwdprints the user’s current working directory.whoamishows the user’s current identity./on its own is the root directory of the whole file system.A relative path specifies a location starting from the current location.
An absolute path specifies a location from the root of the file system.
Directory names in a path are separated with
/on Unix, but\on Windows...means “the directory above the current one”;.on its own means ‘the current directory’.Most commands take options (flags) which begin with a ‘-‘.
mkdir [path]creates a new directory.mv [old] [new]moves (renames) a file or directory.Expressive file and directory names are easier to navigate and remember their content/purpose
Most files names are
something.extension. The extension isn’t required, and doesn’t guarantee anything, but is normally used to indicate the type of data in the file.rm [path]removes (deletes) a file.*matches zero or more characters in a filename, so*.txtmatches all files ending in.txt.wc counts lines, words, and characters in its inputs.
sort sorts its inputs.
head displays the first 10 lines of its input.
tail displays the last 10 lines of its input.